Porting Tekkotsu
[collapse all]There are four different types of “porting” to consider:
Writing Portable Behaviors 
This section describes how to generalize behaviors for maximal portability by testing and adapting to different robot capabilities, or how to specialize behaviors for specific models to take advantage of unique combinations of features, such as LED or button layouts. More...
Generalization
Ideally, you want to recompile for new robots without making any changes to the code. Using the symbolic offset values of the RobotInfo namespace is one way to allow this to happen. If another robot has a similar capability to the one your originally wrote your behavior for, it can use the same name for the offset, (or provide an alias, see Creating New Robot Configurations below) and everything should "just work".
// IRDistOffset is defined by the current robot's RobotInfo namespace
state.sensors[IRDistOffset]
This method will result in a compiler error if the functionality isn't available. This is actually a good thing — it's better to fail fast and let the developer know that they can't use your behavior on their robot than to let it run, trigger the failure, and then make the user track down an error message buried in the console output.
On the other hand, if you don't require the functionality, you may wish to provide some kind of alternative behavior. The easiest way to do this is to test for a compiler flag:
// indicates IRDistOffset should be available
state.sensors[IRDistOffset]
#else
// do something else?
#endif
A list of recommended/available flags is found in Robot Configurations below.
However, compiler flags are somewhat limited in that they only work for the current host hardware, can't handle reconfigurable robots, and for better or worse, are extremely free-form. A more robust technique is to use the RobotInfo::Capabilities class to query either the current host hardware (use the global 'capabilities' instance), a known model via namespace reference (e.g. ERS210Info::capabilities), or lookup based on a robot name (e.g. RobotInfo::getCapabilities("ERS-210")). The last is useful when doing inter-robot communication with different robot models than the local host.
Once you have a Capabilities instance, you can call the findOutputOffset(), findButtonOffset(), or findSensorOffset() functions to check for the availability of various features. One way to do this is to pass the name of the feature as a hardcoded string:
unsigned off = capabilities.findSensorOffset("IRDist");
if(off != -1U)
state.sensors[off] // was found, can use the offset
else
// not available... do something else?
A more verbose, but more robust way to do this is to use the name of the desired capability on a known model. This eliminates any chance of a typo in the name. (The compiler would immediately flag an unknown symbol, but you wouldn't catch a bad string until runtime, and then only because it's never available.)
const char * irName = ERS210Info::outputNames[ERS210Info::IRDistOffset];
unsigned off = capabilities.findSensorOffset(irName);
if(off != -1U)
state.sensors[off] // was found, can use the offset
else
// not available... do something else?
In general, you don't need to bother with capabilities lookup unless you actually have some alternative behavior to offer. Otherwise, just use the the symbol offset as shown in the first example, and let the user find out at compile time if your behavior is unsupported.
Specialization
Sometimes it's not enough to independently map specific capabilities between robots. For example, the Controller uses a set of buttons to allow you to manipulate behaviors while in emergency-stop mode. The group of buttons provide a user interface, and mapping each button individually between robot models wouldn't result in a usable interface.
Instead, in these situations you may find it easier to test for specific robot models, and give each specialized behavior. For example, the EmergencyStopMC uses a completely different LED pattern on each robot.
Again, the quick way to do this is to use the compiler flags — our Makefiles declare the value of the TEKKOTSU_TARGET_MODEL environment variable as a compiler flag so the RobotInfo namespace can import the appropriate robot configuration. You can test for this compiler flag as well. For example:
SharedObject<LedMC> leds;
#ifdef TGT_ERS210
// 210 model, use tail lights:
leds.cycle(TlRedLEDMask,period,1,0,period/2);
leds.cycle(TlBluLEDMask,period,1);
#elif defined(TGT_ERS7)
// 7 model, use the orange LED on the back:
ledengine.cycle(MdBackColorLEDOffset,2*period/3,.15,.15/2-.5,0);
[...]
#else
// no idea what robot we're on... does it have LEDs?
# ifdef TGT_HAS_LEDS
// it does have LEDs, use the last one:
ledengine.cycle(1<<(NumLEDs-1),period,1,0,period/2);
# endif
#endif
However, on the down side this doesn't handle "compatability" targets. For example, the ERS-2xx target produces an executable which can run on either the ERS-210 or the ERS-220. It does this by providing the union of the two robot's capabilities, and then outputs which are unavailable on the host hardware are simply ignored. To handle this case, we can instead rely on dynamic runtime detection of the model:
if(RobotName == ERS210Info::TargetName) {
ledengine.cycle(TlRedLEDMask,period,1,0,period/2);
ledengine.cycle(TlBluLEDMask,period,1);
} else if(RobotName == ERS220Info::TargetName) {
// similar code with ERS-220's unique LEDs
}
#endif
However, this is still relying on the TGT_ERS2xx compiler flag to hide symbols from other platforms, and you either wind up with duplication of code or some tricky preprocessor handling to also support TGT_ERS210 and TGT_ERS220.
Alternatively, using the capabilities discussed in the previous section, we can completely remove the need for preprocessor flags, although in the case of LEDs, we lose the convenient Mask symbols, making this particular example a bit more verbose:
// Get output names:
const char * redName = ERS210Info::outputNames[ERS210Info::TlRedLEDOffset];
const char * blueName = ERS210Info::outputNames[ERS210Info::TlBluLEDOffset];
// Lookup offsets:
// note using getOutput() instead of findOutput() -- we expect that
// these exist, fail fast and throw exception if not found
unsigned redOffset = capabilities.getOutputOffset(redName);
unsigned blueOffset = capabilities.getOutputOffset(blueName);
// Set up the effect:
// note conversion from output offset to LED bitmask in first argument
ledengine.cycle( 1<<(redOffset-LEDOffset), period,1,0,period/2);
ledengine.cycle( 1<<(blueOffset-LEDOffset), period,1);
} else if(RobotName == ERS220Info::TargetName) {
// similar code with unique LEDs on ERS-220
} else if(RobotName == ERS7Info::TargetName) {
// ditto with ERS-7...
} else
[...]
Generalization vs. Specialization
Whenever possible, it is better to generalize than specialize. If you are matching against specific robot models, when you want to use a new robot, you will have to touch every specialization to add another case for the new robot. Making every specialization know about every robot model is an O(n2) operation. Instead, if you test for the particular features you need (e.g. using capabilities or TGT_HAS_... flags, which are listed in the next section), your code will hopefully recompile for new robots without needing any modification at all.
Creating New Robot Configurations
Adding support for a new robot configuration requires defining the sensors, actuators, LEDs, cameras, etc., which are available on the robot. Each configuration is declared in a separate namespace, and the configuration selected by the user's TEKKOTSU_TARGET_MODEL setting is imported into the global namespace as the current target. More...
A robot configuration defines the number of outputs (e.g. servos and LEDs), buttons, and sensors for a robot. These items are stored in their respective arrays in a particular order, which is defined by the offsets supplied by the configuration. Each item is also given a string name, which allows dynamic lookup, as discussed in the previous section.
- Choose a target name: Declaring a compiler flag by this name will select the configuration. Typically this will be of the form TGT_FOO, for example the Aibo ERS-7 is selected by defining TGT_ERS7. (Recall from the build configuration section that you control the target model by setting TEKKOTSU_TARGET_MODEL to the macro name of your choice.)
- Choose a string name: Typically a slightly more readable form of your robot's name, this is used for condensed posture files, model-specific sections of the configuration files, and user feedback.
- Create a RobotInfo namespace: You will introduce your own namespace (e.g. the Aibo ERS-7 uses ERS7Info) where you will list such things as the number of LEDs and joints, ranges of motion, system parameters, etc. The file which stores these values is the core of the robot configuration, and is usually named for its namespace (e.g. ERS7Info.h).
- Optional: write a roboop kinematic description file to support forward and inverse kinematics operations.
Each robot defines its capabilities and parameters in its own unique namespace. The file Shared/RobotInfo.h defines the generic RobotInfo namespace, which imports the namespace corresponding to the current target model. Thus, you will need to modify RobotInfo.h to test for your chosen TGT_ flag and produce the '#include' and 'using namespace' entries for your configuration file.
To make your life easier, just copy one of the existing Shared/*Info.h files as a starting point for your configuration, and then set the Num* values to appropriate values (use 0 if not applicable to your robot). Then delete all of the *Offset values and replace them with the joints/sensors available on your robot. Finally, to maximize compatibility with pre-existing behaviors and motions, you should #define any applicable values from this list:
- TGT_HAS_LEGS
- If the robot is legged, set to the number of legs. (i.e. 'NumLegs')
- TGT_HAS_ARMS
- If the robot has arms, set to the number of arms. (i.e. 'NumArms')
Arms are presumed to have a gripper on the end. (otherwise it might be more apt to call it a leg or tail...) - TGT_HAS_WHEELS
- Set to the number of independently controllable drive wheels on the robot.
- TGT_HAS_LEDS
- If the robot has LEDs, set to the number of LEDs (i.e. 'NumLEDs')
- TGT_HAS_LED_PANEL
- Indicates the robot has a grid-like panel of LEDs, and will define FaceLEDPanelOffset and NumFacePanelLEDs to indicate the outputs.
- TGT_HAS_HEAD
- If the robot has an articulated camera, this will be declared and HeadOffset should be available.
- TGT_HAS_MOUTH
- If the robot has a "mouth" (gripper on the head), this will be declared and MouthOffset should be defined.
- TGT_HAS_TAIL
- If the robot has something that might be considered a tail, this should be declared and TailOffset defined.
- TGT_HAS_CAMERA
- If the robot has one or more cameras, this should be set to the number of cameras and you expect events from the Vision Pipeline. CameraFrameOffset should be defined to give access to the position of the camera(s) via the kinematics library.
- TGT_HAS_WEBCAM
- Similar to TGT_HAS_CAMERA, but implies the camera is not in a fixed position, and may not even be reliably connected. In other words, CameraFrameOffset may not be defined, even though a camera might be connected.
- TGT_HAS_BUTTONS
- Set to the number of buttons (i.e. 'NumButtons') on the robot
- TGT_HAS_IR_DISTANCE
- Should be set to the number of infrared range finders (if any). If declared, behaviors should assume that IRDistOffset is available.
- TGT_HAS_ACCELEROMETERS
- Should be set to number of accelerometers (if any). If set to 3 or more, behaviors should assume that multi-dimensional accelerometers are available. For best portability, match the Aibo axes and symbols, BAccelOffset, LAccelOffset, and DAccelOffset (See ERS7Info::SensorOffset_t).
- TGT_HAS_POWER_STATUS
- Robot may be battery powered and will provide power status in sensors.
- TGT_HAS_MICROPHONE
- Robot has a microphone and will be sending sound events.
- TGT_HAS_SPEAKERS
- Robot has a speaker and can play sounds.
You only want to define these however, when your target value is defined. Otherwise, you would be declaring the capabilities for all robot models, not just your own. So, in other words, you'll want to do something like this in your FooInfo.h:
# define TGT_HAS_BAR
# define TGT_HAS_BAZ
#endif
To allow the same code to compile on a variety of configurations, you can provide aliases for values. For instance, the ERS-7 has a single head button, HeadButOffset, whereas the ERS-210 has two head buttons. Thus, ERS210Info.h maps HeadButOffset as HeadFrButOffset so that ERS-7 code can compile unchanged for the ERS-210. Similarly, the ERS-7 maps HeadFrButOffset to HeadButOffset, but leaves HeadBkButOffset undefined so ERS-210 code which uses the "main" head button will work as expected, but if you try to use the rear head button you'll get a compile time error to let you know there's a robot incompatibility.
This gives you a lot of flexibility as to whether features of other robots can be emulated (and thus you should map name to a similar feature on the current robot), should trigger a compiler error (just don't declare it all), or should only cause an error if used (declare, but set to an invalid value — use with care!).
Finally, you should provide kinematics information to allow manipulation and modeling of the robot's frame. The .kin files in the project's ms/config directory define joint reference frames using Denavit-Hartenberg parameters, and also provide a database of interest points on the robot's body. This is the most conceptually challenging stage, and is documented further on the Kinematics page. However, you do not need to provide the kinematics file to get basic functionality — you just won't be able to use the forward or inverse kinematics functions.
New Hardware Devices
This section will introduce you to the hardware abstraction layer API, and the interface(s) you may need to implement to allow Tekkotsu to interact with a previously unknown piece of hardware. More...
New hardware devices require an interface within Tekkotsu. We have an architecture in place to make this a well defined and straightforward process. By subclassing the DeviceDriver class, you can provide hooks for receiving motion updates from Tekkotsu, and provide sources for sensor information to flow back into the framework. When appropriate, a CommPort class can be created to separate the communication mechanism of the device from the communication protocol, increasing reusability. An example of this interaction is shown in the figure below:
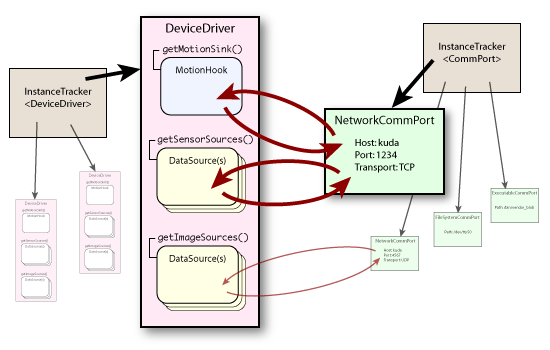
CommPort usage is not required; for instance the Mirage driver is “hardcoded” to use a network socket as it is highly unlikely to communicate by any other means. However the SSC-32 driver uses a CommPort so the end user can connect over a SerialCommPort for on-board operation, or a NetworkCommPort for off-board operation.
Each DeviceDriver can provide a single MotionHook, and provide multiple DataSources for both sensors and images. Thanks to multiple inheritance support in C++, if you prefer, your DeviceDriver class can also implement the MotionHook and DataSource interfaces, thus returning this for the data processing interfaces. An example of this technique can be seen in the SSC32Driver.
You are encouraged to use the plist classes for your configuration settings. Doing so will allow users to configure and interact with your class from the Tekkotsu HAL command line, without any additional effort on your part. (other than, perhaps, implementing the plist::PrimitiveListener interface so you can be notified when a setting is changed.)
The driver provides names for each of its data sources. When selecting a data source, the driver's own name can be used to select the first data source, or the user can specify a specific source in the format "drivername.sourcename". (See DataSource diagram below for an example, "Foo.A" vs. "Foo.B".)
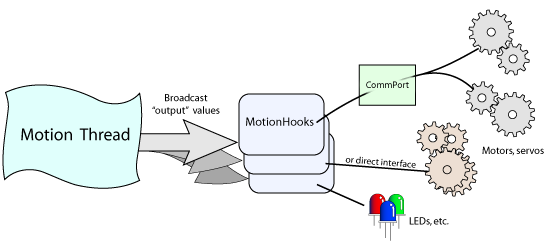
MotionHooks
MotionHooks are responsible for moving the “output” values from Tekkotsu to the corresponding physical hardware.
motionCheck() is called at high frequency with the full array of outputs, and its default implementation will forward the call to motionUpdated() with a vector of only the changed outputs. You can override either function, choosing the style which best suits your device. (e.g. full updates with every value every time, or sparse updates with only the changed values.)
The figure below should illustrate the flow of information and give some examples of usage:
The sequence of function calls made by the framework is:
- motionStarting()
- enteringRealtime(…) (unless starting paused)
- For duration of execution:
- motionCheck(…) → motionUpdated(…)
- occasionally: updatePIDs()
- leavingRealtime(…)
- motionStopping()
The enteringRealtime()/leavingRealtime() pair may be repeated during runtime if the user accesses the pause and run commands, or otherwise modifies the Speed parameter directly. You may receive motionCheck() calls following a leavingRuntime() if the user steps the simulation while paused, or if the Speed parameter was set to run at full speed (any negative value). These are advanced usage scenarios, mostly applied to debugging situations, but easy to support if callbacks are used appropriately.
Keep in mind that the motion hook callbacks are serial with the rest of the motion processing, so your callback processing must return quickly (specifically, well within the number of milliseconds defined by NumFrames*FrameTime in the RobotInfo namespace). If you need to do block, do long term processing, or operate over a low bandwidth connection, consider buffering output values and moving this processing into a separate thread. (see Thread and its subclasses)
DataSources
A DataSource is responsible for moving data from sensors into the framework so that it can be accessed by behaviors.

The sequence of interactions with the framework is:
- registerSource() is called by framework - your subclass should respond by making calls to providingOutput() as appropriate.
- enteringRealtime(…) is called by framework when it is ready for DataSource to start sending data.
- Your implementation should have spun off a thread or registered for OS callbacks during one of the two initialization calls above. During realtime execution, whenever you have new sensor data:
- If providing image data, make a call to setImage(…)
- If providing sensor values, instantiate a scoped lock, e.g.:
MarkScope lock(getSensorWriteLock())
This avoids thread race issues, and also automatically triggers a notification in the framework when the lock is released (the lock instance goes out of scope), minimizing latency. - You can then call one or more of the following to provide your new values:
- setOutputValue(…)
- setSensorValue(…)
- setButtonValue(…)
- setPIDDutyValue(…)
- leavingRealtime(…) is called by framework to stop sensor data from DataSource.
- If user steps while paused, or runs in full-speed mode, you may receive: advance(), nextName(), nextTimestamp() - your data source should respond with set*Value() calls when advance() is received.
- deregisterSource() is called by framework - your class should respond with calls to ignoringOutput() as appropriate.
Note that the DataSource is expected to take the initiative to push data into the framework, which generally will entail creating a thread to poll or block on your hardware connection. See the Thread class and its subclasses for a portable thread interface with support for timeouts and cancellation.
Be sure to call DataSource::providingOutput() for each output which the DataSource is returning feedback. (But not every update, just once at the beginning when first activated!) You should balance each call to providingOutput with a call to ignoringOutput() when your data source is no longer sending feedback. This is so when there is no feedback for an output, the Motion process will fill in the current joint position after each motion update. Thus, if you do not call providingOutput(), you may find your sensed output value is being overwritten with the "ideal" commanded position.
New Platforms
Tekkotsu has already been written with multiple operating systems and computer architectures in mind. The original code ran on Sony's “Aperios” operating system, which is a far cry from the Linux or Mac OS X environments we also support now. More...
Tekkotsu makes use of several common software packages, such as pthreads, libjpeg, libpng, and libxml. Any operating system which provides a POSIX or SYSV interface is a good candidate for running Tekkotsu “as is”. However, the Aibo's custom “Aperios” operating system does not support either of those interfaces, which indicates a good deal of portability is possible.
The TEKKOTSU_TARGET_PLATFORM build setting allows you to separate platform-specific code (such as the aperios and local directories), and perform cross-compilations. Search for occurrences of PLATFORM_APERIOS or PLATFORM_LOCAL to see where specialization may be needed.
Each platform's directory contains the "main" function which initializes and sets up the framework to run on that platform. You may wish to examine local/minisim.h, which demonstrates how to initialize various components of the framework in a straightforward, minimalistic manner.